Posted by: Denver Concrete Contractors
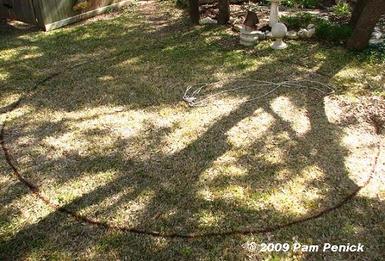
1.) Establish your Layout Lines
First things first, you need to tear out your existing area to make room for the 4 to 6 inch concrete pour. You should plan on the gravel or base area to extend 12 inches beyond your slab. Use two pairs of perpendicular boards with strings to establish the center-point and then attach your string to the top of the stake. On the other end, connect a can of spray paint and paint your perfect circle for the patio diameters. This will complete your layouts lines so you know how far to excavate.
2.) Cut Grass and Excavate your Site
On your painted line, dig down your desired depth and dig out your circular area. You can use a lawn edger on the outer painted line to start your digging. For a 6 to 8 inch thick sub-base and concrete, account for your grade to slope away from your house 1 inch per 8 ft. Grade your soil to follow this gradient so your compacted sub-base will do the same. Measure down from your level string with a story pole to gauge your depth. After your soil is dug out, use a compacting plate or hand damper to get a solid base.
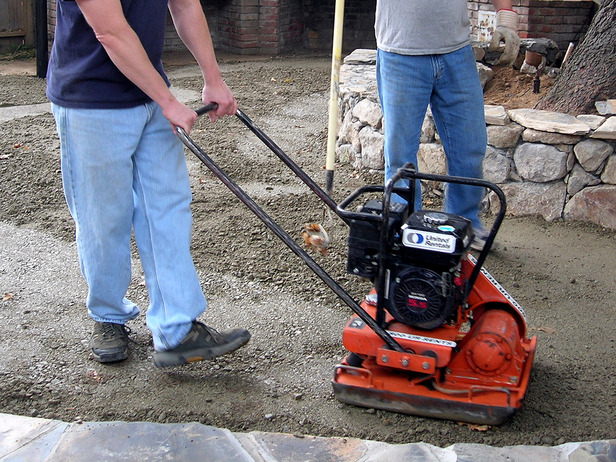
3.) Fill Your Excavation Area & Compact
Next step is to fill your excavated area with a compactable base or gravel. You can use an upside down rake to move the gravel into place until it matches your desired gradient. After you have your gravel in place, use a compacting plate to tamp your material firm. Tamp until the gravel is compacted and at the correct height relative to your lines.
4.) Set your Leveling Lines
To get the right height for your patio, replace your batterboards and retie the mason's line so they are level. For a circular patio, use intermediate stakes between the batterboards and the tie lines to divide the circle into at least eight different segments. Now that you have found the center, drive a stake into the base. Use another string and repaint the outer circle of your patio so you know where to create your stakes for your forms.
5.) Install Your Forms
First pound your stakes in to anchor your forms around the perimeter just outside your new line. Drive your stakes deep enough that they are below the top of your forms. Install your forms (7/16" hardboard) so they can bend between three stakes. Connect your forms to the middle of each stake while making sure the top is the correct distance from the layout string and the right height for your gradient. After you have your forms into place, drive additional stakes behind the forms where the forms require more strength. Most likely this will be between the inside stakes of your forms.
On your painted line, dig down your desired depth and dig out your circular area. You can use a lawn edger on the outer painted line to start your digging. For a 6 to 8 inch thick sub-base and concrete, account for your grade to slope away from your house 1 inch per 8 ft. Grade your soil to follow this gradient so your compacted sub-base will do the same. Measure down from your level string with a story pole to gauge your depth. After your soil is dug out, use a compacting plate or hand damper to get a solid base.
3.) Fill Your Excavation Area & Compact
Next step is to fill your excavated area with a compactable base or gravel. You can use an upside down rake to move the gravel into place until it matches your desired gradient. After you have your gravel in place, use a compacting plate to tamp your material firm. Tamp until the gravel is compacted and at the correct height relative to your lines.
4.) Set your Leveling Lines
To get the right height for your patio, replace your batterboards and retie the mason's line so they are level. For a circular patio, use intermediate stakes between the batterboards and the tie lines to divide the circle into at least eight different segments. Now that you have found the center, drive a stake into the base. Use another string and repaint the outer circle of your patio so you know where to create your stakes for your forms.
5.) Install Your Forms
First pound your stakes in to anchor your forms around the perimeter just outside your new line. Drive your stakes deep enough that they are below the top of your forms. Install your forms (7/16" hardboard) so they can bend between three stakes. Connect your forms to the middle of each stake while making sure the top is the correct distance from the layout string and the right height for your gradient. After you have your forms into place, drive additional stakes behind the forms where the forms require more strength. Most likely this will be between the inside stakes of your forms.
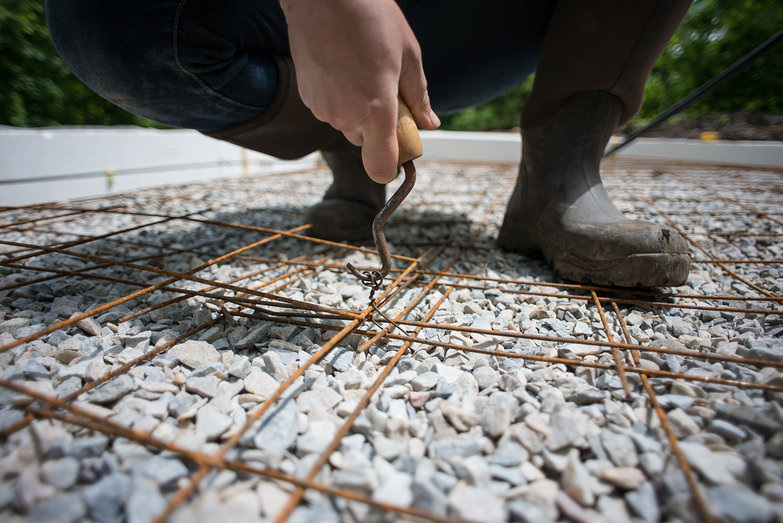
6.) Install Wire Mesh
Lay your wire mesh over your base and tie together where the pieces overlap with metal strips. Next you want to prop up an inch or two off the ground with your first few wheel barrows of concrete. You can use a pick ax or shovel to lift the mesh up and let the concrete sit underneath. Another alternative is using wire bolsters every few feet under the mesh before you pour. This will allow your wire mesh to sit in the middle of your concrete slab and hold together the best to keep from cracking. If your patio is going to be connected to your house, you may want to use isolation board along the foundation to help in big temperature changes.
7.) Pour with 4,000 PSI Concrete
You want to make sure your concrete patio will hold up so using a 4,000 PSI grade concrete is the best way to do it. In your form, start the furthest from your concrete source and dump wheel barrows side by side. Spread your concrete around with a concrete rake or masonry hoe. As you fill your forms make sure to hit them on the outside to eliminate air pockets.
8.) Spread your Concrete Out
Screen your surface with a long straight 2X4 to spread out your concrete evenly along the top of your forms. The best way to do this is using two people, pull the board backward in a back-and-forth 'sawing motion' while you rest the 2X4 on the top of your forms. If you notice the concrete level getting low, shovel some in front of your board to fill the low spots. Your goal is to have a slab that is flat and even with the top of your forms. It does not need to look perfect and smooth, that comes next.
9.) Float your Concrete Surface
With a bull float, you need to push and pull the float in a straight and parallel pattern while overlapping your previous pass. When you push the float, use the back edge and when you pull the float, tip up and use the front edge to create a smooth surface. Continue to float your surface until it is completely even. Make sure to stop floating if you see water start to pool up and allow the water to soak back into concrete.
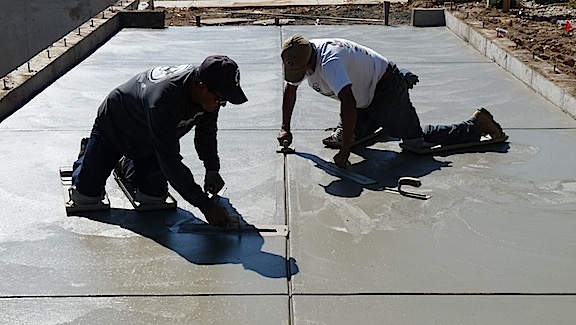
10.) Form your Edge & Control Joints
Using an edger to shape your edges of the slab, carefully run the edger back and forth along the form to create a smooth, rounded corner. If needed, slightly lift the leading edge of the tool to prevent gouging. To create your control joints, use a 1" groover tool guided by a straight 2X4 and follow across your patio down the center. Be sure to cut grooves while the concrete is still workable. Make several passes back and forth down your groove until your tool is to full depth.
11.) Flatten your Ridges and let Cure
To create your smooth surface, use a magnesium trowel to get the final finish look when it dries. Before your concrete dries completely, use a push broom with soft brushes to create a 'broom' so your patio is not slick. Let your slab sit for 8 hours and mist with water and repeat the next few days. If needed, cover your patio with plastic to avoid material falling into your concrete.
You will be able to walk on your patio in 36-48 hours if you use 4,000 PSI concrete. A patio is a great way to add value to your home and improve your backyard. For more information and tips on concrete, visit the Concrete Services Blog.
 RSS Feed
